Showing posts with label Kid Activities. Show all posts

Monday, July 11, 2011

Summer Camp I: Colors and Tie Dye

Remember my fabulous idea to create a summer camp in our neighborhood? Well, I'm happy to report that it is AWESOME!
I thought I'd share with you some of things we did a couple weeks ago when I was in charge. I chose to do tie dye because I love tie dye. It all stems from my summer spent as a camp counselor. We had each group of girls for a week, and at some point in the week we would always tie dye. Usually campers don't pack their cutest clothes, so it was never a big deal to tie dye an old T shirt. And, as often happens with young teenage girls, things would get a little crazy until we were tie dying socks, underwear, and bras. And leaving them flapping in the breeze on the Quakie outside our cabin to dry.
So I love tie dye.
 I decided to do a full-on colors theme for my summer camp group. We started out drawing rainbows, then read "A Bad Case of the Stripes" by David Shannon. This story is so cute and the kids loved seeing Camilla Creme's skin change on every page.

 Then we did a few science experiments. The first was to observe how quickly the color comes off candies like M&Ms and Skittles. Fill a little saucer with water, place a candy in it, then dip a strip of coffee filter in the water. The book I checked out from the library made it sound like the color would creep up really fast, but it actually took some time.
We also did a fun experiment where you fill a pie dish with milk, then add drops of food coloring all over the place. Don't mix it! Just add a drop of dish detergent and see what happens. The colors mix on their own and it really was pretty impressive. The kids also had fun blowing on it to make the colors mix more.

 Finally, time for tie dye! I just bought a kit from JoAnn, which included squirt bottles. These were great because they helped the kids control where they wanted the color, and it cut down on the mess. I had them tie rubber bands on their shirts too, to create those fun tie dye lines. 
 Squirt, squirt, squirt!

After they finished, I wrapped each kid's shirt in a plastic bag. They were supposed to dry for 8 hours then go in the washer, which I did at home to save all the moms the headache. They turned out so cute!

You can also make tie dye cupcakes, but beware, they may change the color of your kids' potty messes for a few days!
We did a scaled down version of this color theme for my little one's birthday party later that weekend and it was also a hit. I think tie dye works best for kids over 5, but littler ones love to color, paint, etc.

Monday, February 28, 2011

Glitterific


If you live in this house, you have to be a BYU fan. I'm probably the least committed of all of us, but my husband has trained the girls well. See, every time there is a game on that he wants to watch, he takes them all to the grocery store and lets them pick a treat and a soda to eat while they watch the game. It keeps them occupied for about the first half, then they usually go off to do their own thing. Bottom line is, these girls love BYU games.
And, you may or may not have heard, but the BYU basketball team is doing AWESOME this year. Last Saturday the girls were super pumped to watch "the biggest regular season game in BYU history" (according to T). So, while we did our regular Saturday chores, they made BYU banners on their own accord.
Then they wanted to add glitter.
Ahh, glitter. What little girl doesn't love glitter? What mom doesn't hate glitter? It is super duper messy and sticks to everything.
There are rules regarding glitter:
1. Hide it way up out of their reach so they must have your help using it.
2. Never let the two year old see it.
3. Every glitter project must fit inside the Glitter Box. That way, you can shake glitter all over your artwork and still control the mess. Just pour whatever is left in the box back in your glitter jar when you're done. See, practical and economical. It's perfect.
And so we added glitter to our BYU banners. Jimmer would be proud.

Wednesday, February 16, 2011

Do it with your kids Wednesday: Toilet Paper Roll People

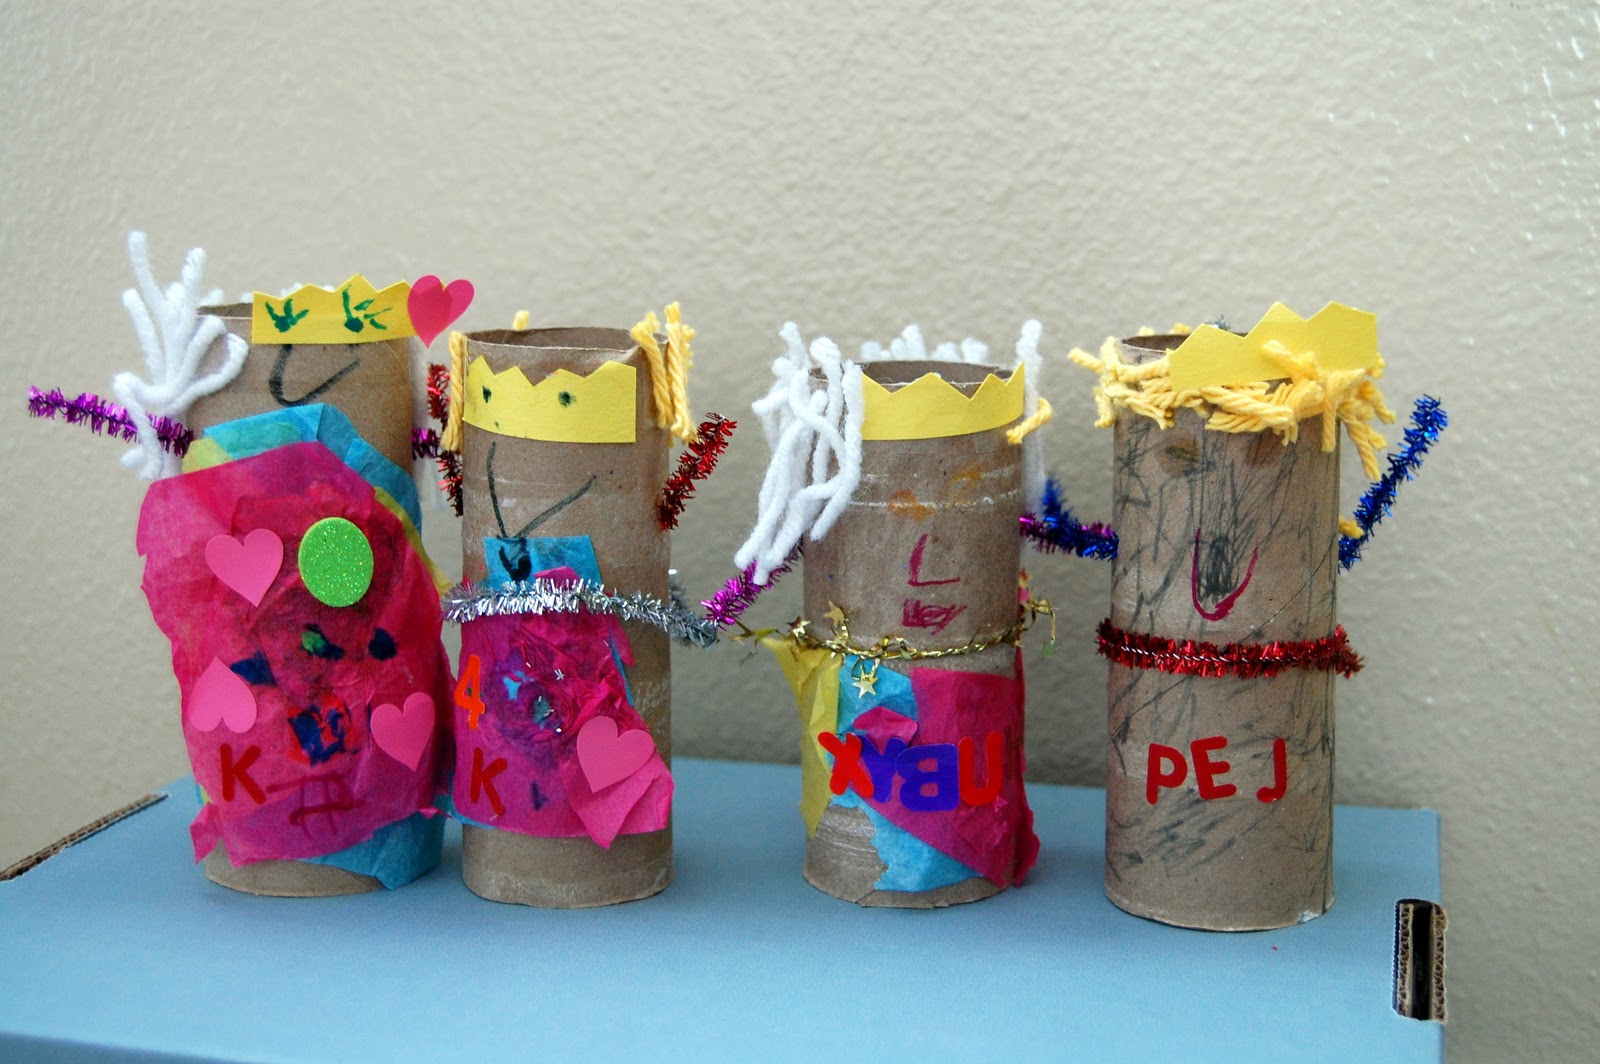
Have you noticed how sometimes your kids have a playdate and they just play together perfectly, leaving you to get your own chores done or blog or whatever.... but other times it's like they are just craving attention, structure, and purpose? That's how our playdate went yesterday. They really wanted to do a craft, so I just pulled out my box of supplies and let them have at it.
Supplies used: empty toilet paper rolls, glue, markers, scissors, tissue paper, yarn, tape, pipe cleaner. Pretty much just whatever I had hanging out in the box.

 A little glue to hold down the princess's gown.

 A little yarn for princess hair. (We used double sided tape for this part and it was perfect!)

 A little sparkly pipe cleaner for arms...

A couple stickers for the prince's initials (Prince Edward James in case you were wondering)


And voila! A toilet paper roll royal ball! The girls had a blast making them, and then played with them for the next hour, taking them on trips around the kingdom (her bedroom).

It's days like this that I am glad to have a box of miscellaneous craft supplies for my kids. I just kind of hoard things that are kind of cute in one box and the kids can use anything in there when we do stuff like this. Moral of the story: keep your junk, especially toilet paper rolls. They have about a million uses!

Friday, January 28, 2011

Fleece Scarf Tutorial


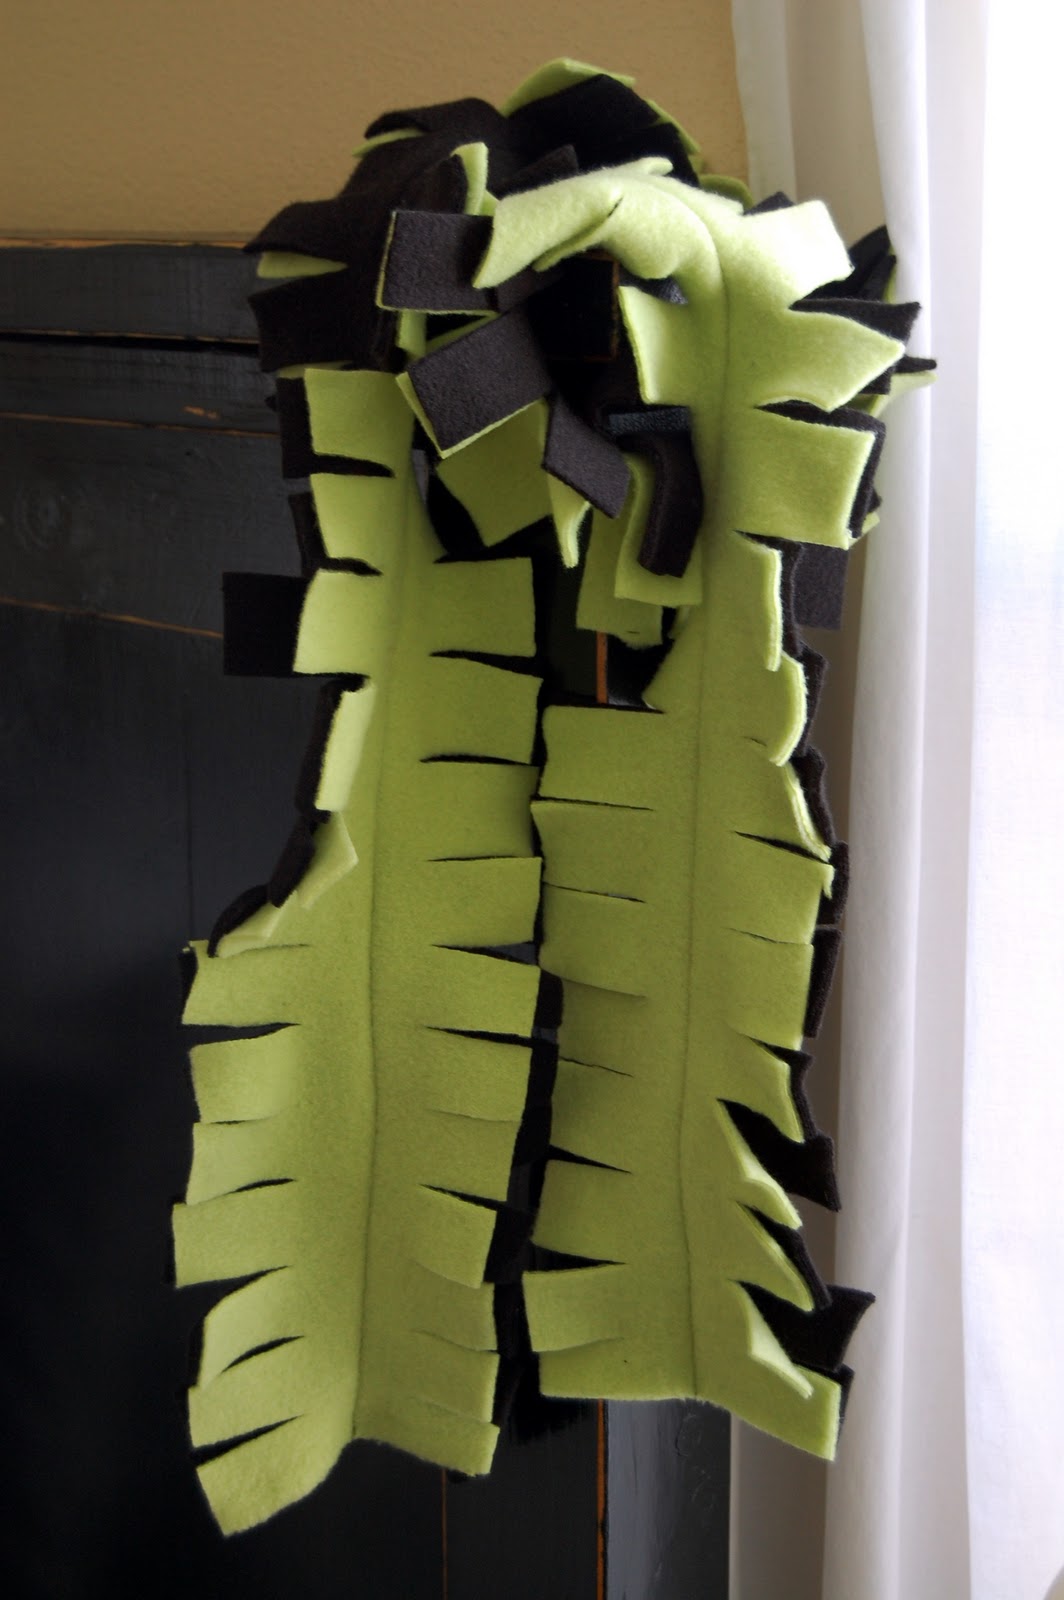
I am trying to hurry and get this post done because fleece is on sale right now at JoAnn, but the sale ends the 29th of January. So if you want to make one of these adorable scarves, buy your fleece right away!

You need 2 coordinating colors of fleece. If you are only making one scarf, you can probably get away with 1/4 yard of each. We did them for Activity Days, so I bought one yard of 4 different colors and we got 13 scarves out of it.

Start by cutting your fleece into a long rectangle, approximately 5 inches x 36 inches. Layer your two peices of fleece on top of each other and pin.

Then sew a straight line down the center. Don't worry if it's not perfectly straight.

Trim your threads, then cut slits in the fleece. They should be about an inch apart. Try to get as close to your sewn line as possible without cutting through it.

Fluff it up a bit and you are good to go! 

See how the girls used the sewing machine all by themselves? Yeah!

Lookin' good!

Sunday, January 23, 2011

Activity Days: Snowman Craft

I just received a new calling and I am thrilled! Honestly, any time someone asks me about it, I gush out some lame reply like "I love it, love it, love it!" That's right, friends, I am now the Activity Days Leader. Woot! If you don't know about Activity Days, you can read about it here. Basically, I get to do fun crafts/activities with the 8-11 year old girls. So fun!
Our first activity was about a week ago. We made these adorable snowman crafts, which were easy, cheap, and fun for the girls. I did a short lesson about how no two snowflakes are alike, just like no two people are alike. We each have our own talents and experiences to bring when we get together and we need to appreciate everyone. And we ate doughnuts and hot cocoa. Total success!
 Here are some of the girls painting. Don't mock the Halloween tablecloth, it saved my kitchen table!


 The longer we were there, the more creative the snowmen became.


If you want to make a snowman of your own, here's how:


1. Tape 6 craft sticks together.
2. Paint the non-painted side. 2/3 white, 1/3 black.
3. Paint an additional craft stick black.
4. When paint is dry, glue the black craft stick across the top to make a hat brim. Add google eyes and paint on a nose and mouth.


I did a trial run of these with my kids a week before the activity and learned that even a 4 year old can do it. Not so much with my 2 year old, who painted everything black and then licked her paintbrush clean.


Thanks to Serving Pink Lemonade for this idea!

Thursday, December 23, 2010

National Turn Your Bed Into a Fort Day

Were you aware that today is a holiday? It's National Turn Your Bed Into A Fort Day. Probably made up by some mom who was desperate to entertain her children during Christmas break, but a real holiday nonetheless. I first heard about it through my cousins' family-- every year each kid turns their bed into some sort of fort (usually they have a theme like Beach Vacation or Army or Star Wars, etc.). Their dad picks his favorite fort and the winner is declared. This tradition continued while my cousin was on his mission in North Carolina, and continues today even though he's married and lives away from home. How fun is that?
We decided to participate this year, although I did it the easy way and just threw blankets around the edges of the bunkbed.

 Of course we had to have treats inside our fort. We ate neighbor goodies and took turns telling stories.


This one's not sure what's going on, but is happy to party!

Tuesday, November 30, 2010

Kid Activity: Bean Tree

Here's a simple holiday craft to make in an hour or so:

A Bean Tree!
 (reference to Barbara Kingsolver, did you get it?)

Start by cutting out a Christmas tree shape on contact paper. Glue the non-sticky part to a sheet of cardstock.
 Assemble your supplies. (We figured out that the twirly noodles didn't stick very well.)

Peel off the paper guarding the sticky side of your contact paper. Now all your little beans will stick without a fuss!


While we were making this, my little girl said "I love to feel them." It's true-- they really do feel cool, especially when you're all finished and running your hand over the entire thing. It's fun to feel the different textures of each legume.

Tuesday, November 23, 2010

Kid Activity: Numbers

Technology is not really my friend today. My camera is busted (yes, my $500 camera. I'm so mad!) and my Word program won't open. So, here's a super simple idea to do with your kids without a photo.

Write the numbers 0-10 on individual cards and scramble them up. Have your child put the numbers in order. See if he can do it in descending order as well. Ask him to pull out a certain number (ie 6). You could also pull out two at a time and see if he can add them.

This is a simple way to see if your child recognizes the symbols we use to represent numbers. This came home as homework for our kindergartener, but our preschooler could do it too. So often kids surprise you with things they have picked up without you noticing.

Friday, November 19, 2010

Kid Activity: Paint a Mural


 Once I helped a lady in our ward move and she gave me a bunch of her junk that she didn't want to take with her. I am a sucker for free junk! I scored a griddle (which I use at least twice a week) and a roll of butcher paper. My kids are HUGE fans of the butcher paper.

 One day I just taped a long stretch of it to an open wall in our kitchen and let them paint a mural. Painting a mural is different than painting a picture on a table because it's so much bigger and you get to stand up! They loved it, even though the younger ones didn't exactly utilize all the space.

My favorite was this from our little friend Max. He painted a picture of how he learned to dive this summer.

Do you see a little boy diving there? I sure do.

Tuesday, November 16, 2010

Gratitude Garland


Here's a fun idea we did for FHE last night, courtesy of http://familyfun.go.com/crafts/garland-of-gratitude-668045/   . I just used their template to cut out leaf shapes on fall paper, then we each took turns writing things we were grateful for on the leaves. They are stapled to a peice of twine and hung on my empty wall (because I was CRAZY last weekend and painted my family room and kitchen and still have not put everything back together. But do you like the color? Sherwin Williams Comfort Grey. Love it. But I digress.)
They would be darling over a mantle, on a stair railing, or pretty much anywhere. It's always good to count our blessings, right?

Saturday, November 13, 2010

Fingerpaint Turkey

Here's a simple Thanksgiving craft that even a toddler can do.

 Use finger paint to paint their palm brown, fingers alternating yellow and red.
 Have the child press their hand onto the paper. Voila! Little handprint turkeys!
 And, since the fingerpaints are out, why not paint a picture of a scarecrow in the ocean?
 Love feeling the ooey-gooey paint as we make our creations.
"All done!"
This was the first time I'd done finger paints with my youngest. At first she was really hesitant, but once she understood I was okay with her making a huge mess, she went wild. Don't be afraid to do things with your kids just because it will be messy. They need to experience all sorts of different textures, smells, sounds, etc. They also need an outlet for creative energy. Crayons can only take you so far, you know?

Saturday, November 6, 2010

Activity: Go Camping Inside

It seems like winter lasts longer and longer each year. I swear, it was snowing in June last year! So, one day a few years ago when we were cooped up and bored with being inside, we decided to set up the tent in the family room.

We hauled all our blankets and pillows inside.


We read stories and ate PBJ's. We laughed at our static-y hair.

 And, we had a great time together.
Sometimes all it takes is doing something out of the ordinary to make your kid's day.

Wednesday, November 3, 2010

Activity: Sorting


Gather a little baggie full of different types of noodles and dried beans. Ask your child to sort them. You can sort by type, color, size, texture, etc.


This sounds so simple, but it so great. For one thing, it kept my 4 year old occupied for about 20 minutes. She sorted everything into its own pile, then I had her count how many were in each pile and decide which one had the most and the least. I also asked her about what the different objects felt like.


Here are things kids learn from sorting:


1. Recognizing things that have similar qualities. This will help with pattern recognition and math skills later.


2. They have to use fine motor skills to pick up the objects and place them in piles. This will help with developing muscles for writing.


3. If you talk to your kid while doing this activity, you will be able to review concepts like more/less, counting, and vocabulary (discussing the textures).


Best of all, if your kid gets excited about sorting, maybe they can take on the job of pairing up all the socks in your laundry!